[ Disclaimer, Create new user --- Wiki markup help, Install P99 ]
Wedar's Guide to The Hole
Contents |
Wedar's Guide to The Hole
The Hole is my favorite zone in all of Everquest. Something about this zone just intrigues me: It is MASSIVE, excellent exp, challenging, and dangerous. You get that true sense of accomplishment after a successful grouping here and just has that classic feel.
I’d really like this zone to become a more popular place on p99, over the last month I’ve recruited a lot of different people in groups and taken them all the way through the zone for anything from enchanter, shadowknight, and paladin epic drops… all with a group of 6 or less. So I wanted to post a type of user guide to hopefully recruit more people to hang around this zone, make it more of an alternative to Karnor’s Castle or Old Sebillis.
This is an excellent zone to level in from 49 – 60. You have to spend some hours grinding enough faction from the warrens to get a key to Paineel (must be amiable to guards, say ‘needz keyz’ to obtain). This is a huge bonus to leveling in this zone: Can bind immediately outside of dungeon entrance with no chance of agro, town in walking distance with bank / vendor / full supplies, and a port/evac location in toxx very nearby. You can buy the actual key to the hole zone near paineel bank for around 100pp, so no annoying key cycle needed to obtain.
Make no mistake, coming here for loot shouldn’t be the main objective (you will be disappointed), you just earn tons and tons of EXP very, very fast.
Zone Benefits:
- HUGE exp bonus
- Can easily pull 1-3 mobs at a time in most places
- Anti-Summon Spells can be used throughout the zone (negative resist check, so resist less and hit heavy)
- All mobs (including undead) run at 20%
- Named mobs can spawn anywhere for loot drops (exception: a named undead can’t spawn on an Elemental spawn point and vice versa). More than one of the same named mob can be up at once (such as 2 bejeweled elementals)
- Decent amount of gems selling for 50-200pp drop off elementals
- Can get epic pieces with a single group, even duos.
- All mobs but golems and undead have relatively low HP / AC for their level
- Currently never crowded. Even if it was, big zone with plenty of camps to get to
- Is located in old world, so bring your MANASTONE!
- Rogue class mobs (Deceiver, Capturer) backstab for 250-350 here. So charm OWNS in this zone
- TONS of high level research components. INT casters bring your concordance of research and leave with spells to scribe or sell
- People love making jokes about ‘Being in the Hole’
- Nearby banking / vendor facilities
Zone Downside:
- Not a lot of people hang out on the Odus continent
- No one sits in there as LFG, mainly bring your own group (you can change that!)
- Golems and Undead are heavy hitters, high HP, and highly resistant (possible to mez, but tough)
- Corpse Recovery can be a pain if you don’t have your Level 1 Rogue here (more on that below)
- Paying to get a cleric to rez you at zone line will probably cost you
- Not a lot of ‘Big Ticket’ items drop here
- Some mobs will complete heal through walls if you aren’t careful (Harvesters and Channelers)
- Indoor zone so no SoW
The Loot
- Loam Gear drops regular (INT caster gear), and named can pop anywhere from elemental placeholders, so no specific camp required to obtain
- Withered Leather drops at undead tower (priest gear), but tougher mobs to drop.
- Imbued Granite Spaulders are nice, but ultra rare (have not seen one drop in 3 levels there)
- Smoldering Brand is good newbie weapon, 14DD proc at level 1 and 9/22 (~300pp in EC). Good to even twink casters with a Tolapumj robe
- Recently added Stonemelder's Bandcan drop, potentialy nice item for high-end raid boss tanking in theory.Stonemelder's Band

MAGIC ITEM LORE ITEM
Slot: EAR
AC: 18
DEX: -35 AGI: -35
WT: 0.1 Size: TINY
Class: ALL
Race: ALL
- Lower end gems (Fire Emerald, Ruby Crown, Sapphire Earring, Speckled Granite pebble, etc). No Blue Diamonds or anything like that here
- Bow of the Underfoot
Getting Out
Shortly after the entrance is a drop off pit that you can’t walk back up from. There are 6 methods to leave:
- Evac/Port
- Fight your way to one of the 3 teleporters in zone (1 leads to Paineel observation room, 1 to Neriak, and 1 to Erudin palace). No keys required (I recall this not being classic for the room with 3 teleporters, so is a p99 bonus).
- OT hammer / gate
- Enchanter can Gravity Flux you out of the pit if you /duel, but need to fight back to zone line
- Bring a rogue and do a bad ass castle crawl out… fight to the top, walk across the giant bridge, and fight through the 6-man room with a locked door (lock picking 201 required to open). You can also get Gravity Fluxed on the top of the gazeebo there and fight to the entrance.
- Whether you are a fatty or short race, you can actually squeeze through the door at the bottom of the Hole behind Master Yael... no shrinking needed! The trick is to jump up on the tiny ridge on the side of the door, then just wiggle / duck / strafe and run to the back, since Plane of the Underfoot is not in game it will transport you back to the entrance! You will actually be underwater behind the boulder in Paineel.
Corpse Recovery
Corpse recovery can normally be a pain, but can easily minimized.
The easy way to get a corpse dragger is as follows
- Make a Level 1 Halfling Rogue that worships BRELL.
- Get a port to tox and hide/sneak in to the pool outside the Hole.
- Get a bind.
- You can swim down the crack in the upper right of the boulder and zone in.
Golems and Elementals and Fiends will NOT be KoS to you, so you can run freely in front of them. Ratmen and Undead will KoS you, but just Hide/Sneak successfully and you can walk through the entire zone. If you get a sow outside you can drag a corpse to the zone line in 5 minutes or less even deep in. This level 1 toon you make can also be a fun thing to explore the different areas on the map and learn where to go in the zone.
Try and be courteous to die in an area outside the main pulling areas, as level 1 corpse pollution is kinda annoying.
Keep in mind sneak / hide are low capped at this level (skill 50), so sometimes you get hide fails for like 2 mins straight. You also walk incredibly slow and need to strafe to try and make good time. If this annoys you, there is another option....
The hard way to get a corpse dragger is as follows
- Make a Level 1 Gnome Enchanter that worships BRELL.
- Get a mule to get about 8-10 10-slot bags full of Bone Chips (so cost you about 800p-1000p, maybe multiple trips)
- Get a Druid to transfer these chips to you by picking you up in Steamfont, and dropping you off in Butcherblock (Don't forget plat for spells)
- Run to North Kaladim and find Gunlok Jure. This is for the Bone Chips Kaladim quest. You get good exp. Hand in until you are level 16
- Buy Gate / See Invis / Invis / Invisibility to Undead / Bind Affinity at a bare minimum. Optional to get Breeze from Fironia Vie, good to regen mana yourself and buff soloists you come across!
- Get ported to toxx. You can swim through boulder crack and can bind just before the drop off. Since you have Invis you can get by rats anywhere, and since you have IVU you can get by ghosts. So now you can run anywhere in the zone if you juggle your invis' right.
- Drag body to ledge, and instead of suicide, just gate up and continue to drag.
As a bonus, get some sow pots, you can zone out and take a swig, then you can CR at sow speed which will really cut down your drag time!
Class Specific Advantages
- Enchanters
Charm and destroy (Elemental Deceiver for lower level, Elemental Capturer higher level). Have a solid group? Buy a Gold Plated Koshigatana or two for 1k or so as a pet weapon. Your backstabbing pet will now proc up to 194DD against summoned creatures in addition to increased melee output. Even if you wipe you can come back to kill pet to get it back. Either way, charm makes you the top DPS class here. Loam gear also seems extremely attuned to your class. TONS of camps for you to solo here, don't think you need to stick to the entrance.
- Druids
GREAT here, good DPS option with anti-summon nukes. Useful to snare runners and backup heals great for when Enchanter pets break charm. Regen helps the melee overcome annoying damage shields too. They are great to snare the enchanter pets too and make excellent duo partners with Enchanters.
- Magicians
Great additional DPS / mana effecient with anti-summon nukes, summon weapons for charm pets Sword of Runes (muzzle of mardu if high enough). CotH can keep a group together by bringing in replacements deeper in. I have also seen some mages solo in her at deeper camps with good exp gains.
- Wizards
A heavy nuke is going to drop these mobs to flee mode near instantly, your dps will be noticed! Burning down heavier HP mobs will also help your tank / cleric out, as golems and undead are heavy hitters. Tash or Malo recommended on those mobs.
- Necros
Can charm undead here (I think they are 50-53), and the pet destroys all. Hits in the 120s or so. But careful as they can summon when breaking. Undead tower has slightly lower level pets to charm (a fallen erudite, 43-45 in level)… They don't summon or hit as hard, but still decent damage output.
- Clerics
Undead / Anti-Summon nukes can help you dps when mana isn’t a problem. Lull can help your group split mobs if you don't have a FD puller.
- Rogues
All normal Rogue DPS benefits apply here, a bit more so since elementals have such low HP, its like you are backstabbing for double. You can also H/S through the zone for CR, although I'm told certain named can see through H/S, I know for sure Master Yael can. Rogues are also good for the lazy people who don't grind faction to get a key, they can let your group in to zone with lock picks.
- Shadow Knight
Extremely useful in undead tower for pulling, as they can Lull the Dead and FD in event of a fail. Also have the HP to absorb the Harm Touches. Snaring runners is an extra bonus
- Shaman
As mentioned backup heals are great for enchanter, as well as taking over slows / haste. Slows / DoTs work great on the higher HP mobs. DoT root parking CC works amazing as well (only golem / undead will summon you) as there are some camps with open areas. Some good untapped potential solo areas for you in this dungeon as well.
- Bards
Charm those backstabbers on multiple incoming and greatly increase the DPS in your group, then kill pet (plenty to go around). Your lockpick skill is also high enough to open the entry boulder to gain access to the zone.
- Monks
Your splitting abilities will actually be needed in certain areas due to high mez resist on certain mobs (see undead tower & golem tower). Also can solo in this zone 50+ with epic (just avoid golems / rats / undead).
- Paladin / Ranger
Make better use of those undead / anti-summon nukes. Paladin stuns help on the casters (annoying dispellers and cHealers) and ranger snare / backup root parking is always useful.
Map
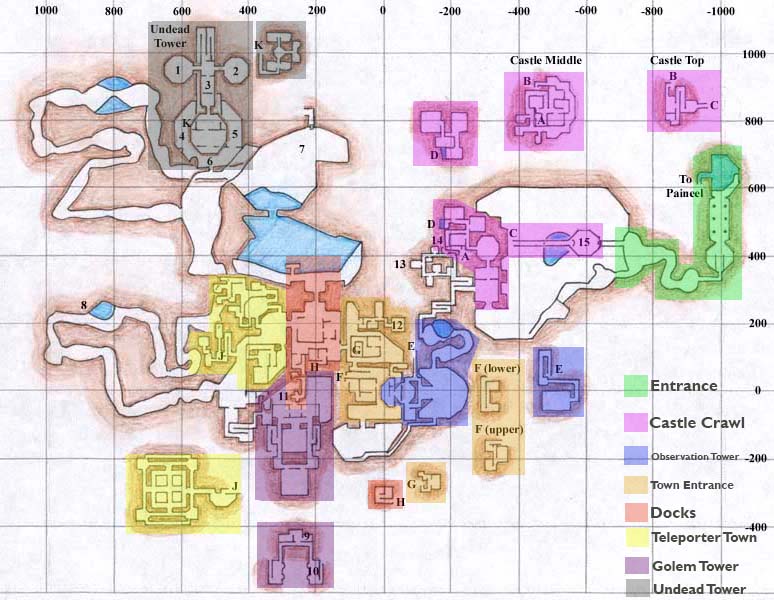
I highlighted my favorite portions.
- Entrance
About 13 mobs before drop off (a 14th paths out of locked room if you are quick about it). Mainly meant to duo / trio or lower level groups. Great option for 49-53 duo teams.
- Castle Crawl
Most stay in the pit area and pull from the castle area, but I like to bring my group in and crawl through to the top. Clear an open room, move your people there. Pull next rooms to there. Repeat. It’s a fairly linear way to the top. Not a lot of people do this and there are a TON of named mobs that tend to spawn in those rooms, usually get 1-3 mobs on incoming (be sure you pull as CHealers can go through walls if you fight them in place). You can work to the top, walk across the giant bridge and pull the 6 man room (I like to send in a suicide cleric with DA, AoE mez, fight it out), Rogue can lockpick at 201 to get you out to entrance area too. By the time you get back to the pit / castle base, should be respawned for you to repeat!
- Observation Tower
Need good CC / Lull pulling or monk splitting (careful as there tends to be a lot of casters), park your people at the sword in the pool and pull. Can clear first level with pulls (careful on very first one, 3 golems are near the first room, first you can typically solo pull just by getting within proximity agro slowly, others will need to split). Behind that room is a room with about 6 mobs, would recommend chanter / bard pulls, or a death-defying monk. There are a few more rooms up top with about 6 mobs total, then bring group to basement and should be a couple static mobs and then a bad ass room to fight 5 or so Elementals (the look and feel of this room with the green flame is just awesome). The observation room on first floor is cool to stand in and look over the old Paineel Ruins too. If you are really smoking it and running out of mobs, you can pull from both left and right tunnel areas, should be 2 mobs each way that are easy pickings.
- Town Entrance
3 mobs just outside down the ramp with a pather going up to Observation tower, the 2 elementals guard the entrance, there is a golem to the side that typically will never agro unless you are very close to it, so can just leave him up. Can pull the interior areas to here with relative safety. Pull all the roamers in the yard just inside (there will be 1 undead mob, drop first if it agros since it is tough to mez), then the Golem + Elemental at the Bank like building. Pull mobs from the barn area and you can move your group into the pool inside with the sword sticking out of it. Pull the mobs from the building interiors (gotta clear out CHealing Harvesters), then work towards the area north, best to avoid pulling in front of the buildings as the dock area has a golem that can agro if you aren’t careful. May not want to bother pulling deeper in the mushroom shop with Polzin Mrid as there are some rooms with 2 golems. But should be plenty of mobs between these two areas that you can pull with relative ease. Once everything in the first town area is clear, can park your group at the sword in the lake area just inside so your pull to area is more centralized. In the basement of that barn area is a cellar that is pretty big, it is a safe area if you want to camp out or take an extended group AFK and resume pulls later. As a bonus, mobs won't Cheal through the floor due to some kind of z-axis restriction.
- Docks
With the Town Entrance area clear, move your group to the north side behind the first building (not the mushroom shop). Go through the entrance way to dock area, there will be a golem standing in a pool. Just stand and look at him and he should agro, careful tho as he brings another golem buddy from the building near him if you are too low a level (could solo agro around 58). Then should be a roamer to the right (Flighty Fiend) and another elemental. The building right there has a golem and elemental as well to clear. At this point you can take a small risk and have your group hug the wall towards the dock area (pets need to be kept very close or will agro). Rush into the dock area and fight a golem + 2 elementals. You can pull mobs to hear from the nearby buildings with relative safety. I like to get Shadow Knights their cell key from mimic building. You need a good puller and DPS as there are 4 golems before the mimic room you need to clear out.
- Teleporter Town
Don’t see a lot of people hang around here, but is an area with PLENTY of mobs. You can go through the entrance way to the right just outside the docks, park your group through the entrance way just to the left (best not to fight near the tunnel entrance to docks else repops / roamers may agro). Can make a few pulls here, but then can clear the building to the north (lull a few mobs in first room, as there are about 7 just hanging around). Be sure not to fight in place, but pull mobs back to your spot to avoid healers through the walls. Can continue to pull mobs from dock area to here too.
You can also crawl through what I call the library (point J on the map). This area on the map is misleading, it makes it look like only 1 big room, but it is actually THREE levels. First level is toughest because it has about 5-6 golems on it, but the lower 2 rooms are heavy on elementals and easy killing. Pull initial mobs to the stairway you go down to avoid CHealers (is tight quarters, but once first corner outside is clear, you can move out). Similar to a Castle Crawl, you can just move up and down these rooms and clearing mobs, is a ton of fun. There are also no roamers, only stationary mobs here so you won't get any surprises except for repops.
A quick sidebar about the teleporters… when leaving the Docks area go to the right and you turn left through the entrance way, there is a building / door to your right. Only 1 mob in here, at the way top there is an elemental by himself with a door laying on the ground (like it was knocked off its hinges). When you step on this door you teleport to paineel observation room (safe spot). The great part about this teleporter is if things go south with your group and evacer dies, you can probably run up here and get out in time. This teleporter is funny in that it doesn't teleport you immediately, wiggle around on it some and move off and onto it, but it will work eventually.
The 3 'official' teleporters I don’t believe are shown on the Hole map from the wiki. Next to that building with the hinged door teleporter is a back wall with 3 bricked up archways. The archway to the far right is a false wall, go through it and there will be a series of rooms, first room to the left is the teleporter room. Will be a golem standing in the middle with 3 columns of Purple light behind him and to the sides. When looking into the room from the door here is where the teleporters lead:
LEFT = Paineel Observation room.
CENTER = Neriak Third Gate (top of Temple of Innoruuk, Cleric Guild. One guard on patrol)
RIGHT = Erudin
Can pull from these rooms down here too but seem to be golem heavy.
As serendipity would have it, I discovered a FIFTH teleporter when running around. As you exit the secret hidden wall (the false archway), run diagonally to the right towards the support pillar. You will wind up zoning into the Paineel Observation room.
Perhaps there are more teleporters hidden elsewhere!
(NB: one or both of these two "extra" teleporters are likely just due to z-axis bugs on P99 related to the three teleporters below. Wedar: Confirmed this, the 2 additional teleporter spots I mention are exactly above the Paineel room teleporter. Fix coming soon?)
- Golem Tower
Not for the faint of heart, recommend your group be high level 54+ with a solid tank. Monk puller highly recommended as there is a room with 5 golems to clear. To get here, if you are looking out of the tunnel that starts to lead down to the Undead Tower (just outside of Teleporter Town), to the right is a building with a few mobs, crawl through that building until you reach Golem Tower. The courtyard is a safe zone, no roamers. So can park your group there for pulls. First entrance has 3 golems to split. Then side rooms have some elementals and a golem. When those are clear, around the bend straight back from entrance is the 5 golem room. They all agro me when I pull, have not tried to pacify before pulling. On live I know a named Steel Golem spawned here as the middle place holder pre-revamp, but my guild only attempted him once and we wiped on the pull (terrible pathing on live, much better on p99). I recently found this mob using wayback machine searches for the era, name is Retseth Tretse and believe he drops a 5ac +10 str +10 MR +30hp Monk only tunic. I posted on p99 forums to add mob in, but I don't believe he shows up yet.
Anyways, that 5 golem room is optional, but you may start running out of mobs to pull. Can crawl your group through this building too and take out some of the rooms. Careful for the far back middle on the first floor as it is a 5-6 room pull with at least 2 golems. Towards the way top, past the windows is a room with Schnozz the Flighty. I dropped him once and he had no loot table (not even coin). He is also next to his twin, Kejar the Mighty, and you can hear him yelling ‘Gimme Shiny! Gimme Shiny!’. He is a quest mob where you can risk handing in a Shiny Metallic Robe for a Shiny Robe of the Underfoot (but a chance you get back some garbage). Never handed in to him and don’t know what he cons, but may want to charm or sneak behind for turn in if KoS.
- Undead Tower
One of the most dangerous areas in the zone to stick around at, is all undeads that can range up to level 53 (some named and quest mobs con higher). To get here, between Teleporter Town and Golem Tower is a cave entrance, bring your group in here and start crawling down it. Just kill, loot, move down as it is a far run to tower, no need to pull. Ranger epic hand-in mob / fight is mid-way down, easily done with 1 group. A plateau with 3 elementals is just outside undead tower, if you clear this up, all the rest are undead. All undead here are extremely mez resistant, recommend root parking them instead or maybe charming (no feedback on resists). Necros can take them for awesome pets too.
When pulling undead you could have your enchanter pacify, but I’ve seen a LOT of resists. A shadow knight / necro seems to have better success with their undead lull line of spells since it has a negative resist check.
If you are here for exp and to farm some withered leather, this area could easily accommodate 2 groups of 6. I have seen named spawn here fairly frequently with each spawn cycle, if you hang around here for 3-4 hours I suspect you may see 5-8 pieces drop.
A solid group of 6 could handle all the upstairs mobs once broken (there are 16 mobs to kill including Ghost of Kindle who is on same timer, and 2-3 mobs within pull distance in hallway… doubtful your group will stay fully ahead of repops). Pacify/Lull the rooms to pull until they are broken, then simply wait for your repops (best to wait in one of the 3 rooms for full spawn, then move to next room to wait for spawn cycle, etc).
I think the bottom of tower and graveyard could be handled easier than the upstairs. The fallen erudite mobs are easier to kill and mez. When rooms are broken you can stay in one area, kill respawns, move to next area. There is a crypt area that is accessible from a door in the left graveyard, there are 4 fallen erudtes down here that are easy fights. The reason to come down here is for Dartain the Lost (36hr spawn, drops withered leather tunic and other goodies). I’ve dropped him twice, resisted all slows and snare and hit hard with a lot of hp (dropped that EB shield once, Withered Tunic the second time). Also hard to pull as he can snare you early and make for a long walk up, so best to fight him near his spawn. He is behind a locked boulder (201+ lockpicking), but if you are KoS he’ll agro through the door (I believe this to be a bug that needs to be fixed).
Tips for epic fights
Enchanter epic (Ghost of Kindle) She is at the way top of the tower. Your group can IVU and run essentially straight back (short run) through a door that leads to a narrow hallway. If IVU drops in this hallway stand and fight as there is usually only 1, maybe 2 undead to agro, if someone drops in the middle of 5 undead before hallway, best to let them die and drag to your cleric. Keep in mind, if you IVU your enchanter will lose their awesome DPS back stab pet, so consider this if you want to fight your way in. When in the narrow hallway, go all the up until you see a closed door. Let your puller go out there, 1 mob to the left to bring in (High Scale Kirn for shaman fight won’t agro directly in front of you). After that, Kindle’s room is to the left. Kindle herself is indifferent to all and won’t agro/assist, but she has 3 undead in her room. Is possible to lull entire room and pull her solo, but best to play it safe and clear the room first then drop her. Kindle herself is a pushover, easiest ghost mob in the hole it seems.
Unsure if this has been nerfed, but an SK I went there with had an interesting pull tactic. Kindle is on a different faction than the rest of the zone, so we got to the hallway before the main room with High Scale Kirn. He IVU'd and waited behind Kindle. When Kindle began to cast a spell he taunted and ran back to us (Taunt didn't break invis). He was able to get Kindle solo this way! Can even pull her out of undead tower completely if you're fast enough, but she will nuke you and break your IVU
Paladin epic (Keeper of the Tombs) He spawns in the graveyard to the left of the tower. Lull / Pacify and clear the graveyard (if your puller is NOT KoS to Keeper you don’t have to lull him, as I’ve pulled mobs past keeper without him agroing, he won't assist). I have duo'd him as a 60 monk tanking (not extremely geared out... epic + 24% haste item with Black Panther and an IFS) and a 51 paladin. Paladin healed me until OOM and then LoH when needed. Was a close and FUN fight! Careful, Keeper will run at 20%, so root accordingly.
Ranger epic (Jaeil the Wretched hand in to spawn Jaeil the Insane) This is an easy fight, but since you are handing in an item and risking losing it in event of a wipe, bring enough people. Recently did this fight with a Warrior / SK / Ranger / Cleric and the cleric was complaining he barely had to heal anyone. Just be sure you educate your fellow group mates on turn in, do NOT attack Jaeil the Wretched, attack the mob that spawns from hand in (Jaeil the Insane).
Shadow Knight epic (Caradon / Kyrenna) If you are here to turn in mimic key, stay outside castle and clear way to ratman prison. Have SK hand in key to Caradon to spawn Kyrenna, they will both attack. Have SK DoT Kyrenna and FD out of room. It seems like Caradon will revert back to his non-agro self and you can solo pull Kyrenna out to in front of castle (NOTE: The rats will assist Kyrenna, so plan accordingly). A 59 SK tanked her and we had a cleric and 2 monks. Needed maybe 3 CHeals before the job was done. I have not attempted the Ratman Guard fight here yet with a group of 6, but may need more for that or a warrior with defensive discipline to tank (believe he hits in the 300s).
Shadow Knight epic (Ghost of Glohnor for hand in) He spawns anywhere in the tower in place of 'A Fallen Erudite', so you will need to clear placeholders if he isn't up. I recommend doing this in the crypt below as there are 4 placeholders there, and you can sneak tag the west graveyard PH without agroing the other undead. Can even access the East graveyard PH if your DPS is good enough (or for the lazy group, can lull agro the East PH if it is up by /target a_fallen_erudite and casting chain lull. They are on Minions of Underfoot faction and won't agro the other ghosts. Careful tho as a golem wanders in and out of the graveyard and will assist the fallen erudite if in range). When you hand in, Mummy of Glohnor spawns in the back of the crypt, we had to agro him to get him to come at us (won't automatically run at you like the epic guide states). We killed him with a single group using a 59 SK as a tank and wasn't that rough of a fight, but careful, mob does ENRAGE.
Shaman epic (High Scale Kirn) Just clear that 1 guy to left when you come out the doors, and the 2 surrounding him in the pool. That is all you need to clear out, surrounding rooms shouldn’t agro. I have never seen Kirn agro on anyone, I believe him to be apprehensive to all. Cons yellow to a 54. I have not attempted this mob with a single group yet, although I'm told he will HT your shaman hard after hand in, so Celestial Heal him beforehand.
Conclusion
This zone is awesome, please make your way here and make it a popular place on P99, you won’t regret it. If ever you need your epic drops or want some insane exp friend me (Wedar in-game, Rygar on the P99 forums) and shoot me a tell.
