[ Disclaimer, Create new user --- Wiki markup help, Install P99 ]
Saum's Guide to Quad Kiting Velious
Some druids prefer root rot, some prefer charm kiting, some prefer to group. As for me I have always preferred to quad kite. I’m writing this guide to give my fellow druids additional options to quad on their way to 60. In no way am I saying this is faster or easier than old world, or kunark quading areas. I just hope to give you options should your favorite camp be taken or if you need a change of pace. Since there was no guide for Druid quading in Velious I decided to make one.
Levels: 34-37 - Tizmaks
Zone: Great Divide
Locations
- 1st Cave Loc -1515,1660,
- 2nd Cave Loc -2200,2260,
- Far 2 Loc -2560,2240.
Percent of times it will be camped: 25%
Benefits: Occasional Velium and Tizmak armor drops. Close to dragon portal so its easy to pick up ports.
Drawbacks: Tizmak Augers and Spirit callers can break up the flow of your kites.
Description:
If you’re a young druid looking to get rolling on your quading this is one of my favorite camps! But before we get started on that a quick word of advice. Since you had to run all the way over here from Ice Clad be sure to pick up your Great Divide tooth and BIND AT THE BANK IN THURGADIN.
Once you have that out of the way you are set to begin. As you exit Thurgadin you can ride the wall on your right to get to the Tizmak caves. First note that there are 3 primary caves as well as an outpost on the far west that we will be dealing with. They each have a large flat area out front to pull your quads to. If you can also pull down to the flatlands outside of Thurgadin if you are so inclined.
I preferred the eastern cave closest to Thurgadin “Cave1” I would pull the 1 wandering in front as well as the 2 at entrance. For my 4th I would run towards cave 2 and pick up the wanderer on the shelf a smidge below cave 1. You can just as easily pull 4 from inside the cave if it suits your style. If you do choose this method I recommend invising and passing 4 mobs. Snare the 4th and run to entrance. Worry about snaring the others once you are in the flat open area.
Cave 2 & 3 are just a little west of Cave 1 and if you need to pick up a couple mobs, you can find 2 mobs past cave 3 again headed west. They are handy if you happen to have an Auger or Spiritcaller pop in one of your normal pull spots.
The victims:
These two nasties which will spawn from time to time are both shaman mobs:
Unfortunately if you spawn either of these 2 in your respawns you really only have 2 choices
- move to the other cave “preferred method”
- pull it down with harmony and root rot it. If you chose this method remember to stay at max range since they are casters and have your magic, poison and disease resists up. They aren’t hard. Heck you can probably burn them down. But BE AWARE they can blind you so it’s important to know your surroundings. It’s one of the reasons I always pulled them all the way down to the Thurgadin basin area.
Some of the biggest benefits are you can make a little plat from the Tizmak drops:
- Tizmak SleevesTizmak Sleeves

Slot: ARMS
AC: 8
WT: 4.0 Size: MEDIUM
Class: ALL except NEC WIZ MAG ENC
Race: ALL except DWF HFL GNM
- Velium Great StaffVelium Great Staff

MAGIC ITEM
Slot: PRIMARY
Skill: 2H Blunt Atk Delay: 36
DMG: 9
Effect: Velium Shards (Combat, Casting Time: Instant) at Level 25
WT: 9.5 Size: LARGE
Class: ALL except BRD ROG
Race: ALL
Since you bound at Thurgadin bank you can empty your bags and bank in 1 spot ! “You did bind in Thurgadin didn’t you?
But more importantly you can pick up a ton of ports from both great divide and Thurgadin. You will make more bank from porting than from killing the Tizmak’s
Levels: 38-43 - Kodiaks
Zone: Great Divide
Locations
- 1st Cave Loc -6050,2860,
- 2nd Cave Loc -6770,2675.
Percent of times it will be camped: 10%
Benefits: No competition for camp.
Drawbacks: Almost no loot of any kind, occasional wurm.
Description:
The Kodiaks were really good experience. I was getting more than 1 full blue per quad all the way to 42. Even at 43 you get 3/4 of a blue. The exception of course would be level 40. I only averaged a little more than half a blue per quad.
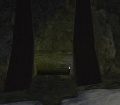
Entrance to cave one.

Entrance to cave two.
Cave two sweet spot.


The victims:
There are 2 Kodiak caves to quad. I preferred the farthest cave heading south “cave 2”. The method I used was to pass 3 mobs and find this nice little corner between kodiaks 3 and 4. I would target kodiak 4 with snare and as it was casting switch to Kodiak #3 and start spamming snare. If I timed it right I could snare both before Kodiak 4 hit me. Then just run out of the cave and snare the other 2 kodiaks in the flat area in front of the caves. YOU WILL GET HIT just don’t panic. They do occasionally drop claws, but honestly this is a cash free camp. The good news is it’s RARELY camped so you pretty much have free rein here. Though if you decided to AFK be sure to use hide and check the Kodiaks to make sure they are indifferent. Also 2 things to look out for.
- Icetooth is a named Kodiak. Yes he can drop some loot but it is basically junk and he has way more HP than the other Kodiaks. If he pops in your quad area, just move to the other cave.
- It's rare but a Wurm can path up in front of the cave. He is not social with the Kodiaks so just give him a wide berth. There is plenty of room to do your work in peace.
Levels: 43-48 - Ulthorks and Walruses
Zone: Eastern Wastes
Locations
- Ulthorks: 568,1480,,
- Walruses: -8000, 3185.
Percent of times it will be camped: Ulthorks 80%, Walruses 20%.
Benefits: Easy camp.
Drawbacks: light loot and ress’s are hard to come by in EW.
Description:
If you are just cutting your teeth when it comes to quad kiting the Ulthorks and Walruses are a great set of mobs to learn on. You will find that Eastern Wastes has plenty of room to quad along the walls and ocean front.
For the Ulthorks in the northern part of the zone you will find gathering and quading very easy. It also seems to be camped a bit more than the Walruses. Its pretty straight forward. Just snare four mobs and drag them to the ocean front. Circle them and begin your kite.
Side note: be warned the Ulthork Man-O-War’s are tougher than the normal warriors. Save these until your mana pool / level allows for efficient killing.
The Walruses on the South side of Eastern Wastes are usually uncamped. They are also my preferred camp of these two because of that. Once you enter Eastern wastes from Great divide. Head south “BE invis to avoid the Kromrif Death Squads” once you have made your way to Ice fangs hut you are ready to set up camp.
As you get started just run out and snare the normal 4 mobs. I chose to run my kite between Icefangs hut and the beach but you can run it however you like. There is plenty of room.
The walruses like to hang out on it in mass on Walrus hill and it is viewable from Icefangs hut.

I found medding at Icefangs hut was relatively safe.

Here is a pic of what I like to call Walrus hill. The walruses like to hang out on it in mass and it is viewable from Icefangs hut.

Some advanced tricks for you:
Once you have enough mana or they start to green out. It is much more efficient to quint kite vice your standard quad kite. Remember that once you have damaged 4 mobs in a kite any additional mobs will NOT be hit until one of the original four dies. With this in mind what I liked to do is go our and snare a single Walrus. Run back towards Icefangs hut and use ES Vambs on it as it approaches. Go out and repeat that 5-6 times depending on how many were light blue vrs dark blue. Then gather then entire mass up and begin my kite. Once one of the original four mobs being damaged dies it will automatically start damaging one of the mobs that previously was not being damaged by our AOE. You folks that are lucky enough to own a Lumi Staff can really take advantage of that. This method comes in handy for just about any area where the mobs are starting to green out to you.
Levels: 44-45 - Panthers and Haze Panthers
Zone: The Wakening Land
Locations
- All over
Percent of times it will be camped: 50%
Benefits: Cash from Black Panther Skin, Haze Panther Skin and Yew Leaf.
Drawbacks: Not a beginners Kite, RNG can go against you on pelts.
Description:
If you are looking to try your hand at a kite that is not straight forward, You might give this one a try. The sweet spot for XP is 44-45 but honestly I still run this kite when I get a little bored just because it can be fun and profitable!
To begin with you need to know the secret to making this Kite profitable. Simply put its Spawning and killing Haze Panthers. The normal Black Panthers are their place holders. The other key thing to know is you NEED to have see invis up at all times. The Haze panthers run around invis’ed and you may not see them on track without it.
To begin our kite I like to start just outside the dragon ring. Now due to the Holgresh & Merc’s that roam the field, I ALWAYS start my kite with invis up. The goal is to simply find 1 Panther and snare it. It will be doing all our work for us.
Once you have found your single panther do a quick look around to make sure there is not any KoS mobs around you and then snare him at max range. As soon as it is snared re-invis your self. This is key as it will allow you to go plodding through the field without picking up additional mobs you do not want.
As you are running invis through the field use your track to find additional panthers. You do not have to cast on them as they are social with your snared Panther. Once a panther agro’s you have a choice.
- Switch and let the new unsnared Panther be your agro assist mob,
- drag it to the zone wall to snare it & then reinvis.
I normally liked to bring each panther to a zone wall for snare as I found them, but once you get the hang of it you can just let the unsnared panther do your drag work for you. Once you have a group of 4 panthers, It’s time to find the nearest wall and begin your quad on the other Panthers.
Note: if you see a Haze Panthers on track you may want to stop adding mobs and just get it.
Be warned that there are some biggies that spawn around the ring. AVOID Wuoshi and Priest Delar like the plague !! Also remember to be foraging the entire time you are in zone. Yew leaves sell very well at 50p each. Between those, the Panther Skins “50p each” and the Haze Panther Skins “A whopping 1k Each” you may find if the RNG is with you, that you can make a lot of cash here. I know I did !
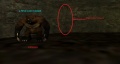
The victims:
Here are some notes from my Friend Tadhg
There are 4-6 panthers up at any given time in the eastern half of the zone. They have three different set paths. One path travels southwest from Kael almost to the portion with the dragon portal and then around the east side of the lake (near where the mercenaries are all running). Another paths around the area of the dragon portal. The third is up north, near the ruined buildings close to the sentient suits of armor.
There is a 25% chance a haze panther will spawn upon the death of a panther. So kill 4 panthers and 1 haze panther should spawn. The haze panthers share the same pathing as the panthers.
Haze panthers will invis themselves, so have see invis up if you really want to find them.
A skin will drop approximately every 10 kills. Math-wise, that means you need to kill 40 panthers to get 1 skin to drop. Around 2 black panther skins will drop every 4 panthers.
Levels: 49-52 - Giant Fort
Zone: Eastern Wastes
Locations
- -1780,2900
Percent of times it will be camped: 20%
Benefits: Faction and some cash.
Drawbacks: It can be hard to get a ress in Eastern Wastes, have to work around the A Frost Giant Captain.
Description:
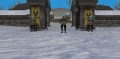
This camp is another one of my favorite camps. I leveled nearly exclusively from 49-52 using this camp. The layout is very straight forward. There are 8 mobs in the camp along with the Captain. When I was doing this camp I like to split the 8 mobs into 2 different kites “using the captain as a separator”. The large area north of the giant fort is very safe and rarely do you see any mobs there.
My first kite would begin by to waiting for the captain to leave the front of the fort "he paths towards the right building" I would pull the 2 front mobs and snare them. I would then run into the fort and snare the 2 mobs inside the left building. These 4 mobs I would bring towards the entrance of the fort and then run out of the fort to drag them northward.

Here is the safe spot north of the fort.

The 2 front guards.

The two in the left building.
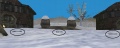
simplified layout.
For my second quad, I would pull this 1 Giant...

... along with the 3 in the right building.
The only real issue with this camp.

Pull the Captain towards these dwarves.


The A Frost Giant Captain has a ton of hit points and can really throw a wrench in you kites. If you are smart though, you can learn to use him to your advantage. North of the Giant fort is a group of dwarfs. You can bring him to the center of that camp and snare him as he arrives. They will do the work of killing him for you. Alternately I give you this little gem. You can have the dwarfs do the work for you while you med and get the kill shot !!
If you bring the captain to the dwarf camp from the WEST side you can have 2 dwarfs beat on him at one. Once they have engaged him move further over towards the eastern hut and med. As soon as he has finished killing the cook and guard he will head towards you. At this point the other 2 guards will engage him. He normally is able to kill these as well. But will have extremely low health “usually 20% or less” I always rooted him to be sure he fought the second set of guards. Now all you have to do is stand up and finish him. You get credit for the kill and the dwarfs did all the work while you medded for your next kite! It takes a little practice but it can be done.
The pic above should give you a general idea of how to accomplish this.
- bring him to area 1 if you want a dwarf assisted kill, and slide over to area 3 once the first 2 engaged him,
- bring him to area 2 if you just want the dwarfs to kill him directly.
Side note, he can drop Giant Woven Vest, a decent melee tunic.
Between the tunic dropping from time to time and players looking for toes and heads for faction I made a decent amount of cash while I was here. Not to mention when I left I no longer had issues with Woushi or ToV faction!
Levels: 50-54 - Wyverns
Zone: Cobalt Scar
Locations
- upper part of the zone.
Percent of times it will be camped: 90%
Benefits: Cash, Cash, Cash oh and cash.
Drawbacks: Always camped and Drakes can get in the way.
Description:
Not much needs to be said about this camp. It is certainly one of the more popular camps “and for good reason” The primary thing to know is that Drakes and named are social. You will want to pull your quad down to the beach area. The Drakes have an AoE that can be a problem and are to be avoided. "Hence why you will want to quad at the beach area."

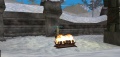
An unsuspecting mob.

Quad in the beach.


Side note for you. One of the things I prefer to do during my down time here is fish. You can fish while medding up and the Cobalt Cod sell very well.
Levels: 54-56 - Tar Goo's
Zone: The Wakening Land
Locations
- -3050,-1400
Percent of times it will be camped: 40%
Benefits: Easy Camp & Cash.
Drawbacks: Slow XP.
Description:
The Tar Goo’s in Wakening Lands are a decent camp. The XP is not as good as Geo’s or Suits but it has the side benefit of being really good cash.
There are 2 camps of tar Goo’s.

The tar goo.


The first camp is close to the dragon Ring. It consists of 2 rooms. 1 has 3 Tar Goo’s and the second has 4 Tar Goo’s. When I do Goo’s this is the camp I prefer to use. Since at 225 Wis I have enough mana to kill all 7 in 1 go. If you have a lumen staff I highly recommend you choose this camp as well. I would start by gathering up the 4 in the far room and then grab the other 3 on my way out of the caves. I would wait to snare the rest up until I had all 7 mobs in the field. Some prefer to kite these around the dragon ring. I preferred to go the opposite way. I simply rode the zone wall and cast at my leisure. This is to avoid players attempting to “help” and Woushi.
The Second is on the back side of the Geo caves. There are 4 mobs in a room. The nice part about this camp is you can quad inside the room. “There is plenty of room” The down side is there are only 4 mobs here, So XP will be slower.
Once you have killed your quad you are only half done, as the goo’s actually split into 2 mobs upon dying. The smaller Tar Goo’s that they spawn are what drop the loot so if you are looking to make cash you NEED to kill these little Goo’s. They don’t have very many hp and are a simple kill. Use your lumin to finish them off and loot up.
A few drops to pay attention to would be Tar goo Strands. They sell very well for 50 plat each in the tunnel. Also I had a smidge of success selling the Glob of Tar for 50 plat a stack to tinkerers. Between these and the gem/jewelry drops I made a sizable amount of cash from 54-56 on these.
Warning: THEY WILL SOCIAL AGRO THROUGH THE WALL.
Levels: 54-58 - Suits of Sentient Armor
Zone: The Wakening Land
Locations
- 1400,-3200
Percent of times it will be camped: 80%
Benefits: Cash, Cash, Cash.
Drawbacks: Mobs have a ton of hp’s.
Description:
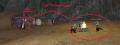
If you’re Lucky enough to find the A Suit of Sentient Armor’s camp available you definitely want to take it! You will find this camp can be very profitable. This is mostly due to Velious Gems that drop from the Armors. In particular keep your eyes peeled for Crushed Flame Emeralds. Also the Armors can drop Sentient Armor pieces. The can sell for 100-250 a piece in EC Tunnel.
As for the camps themselves there are 2 camps. The first is known as 4 suit and the second is 6 suit. You will find no matter which of these camps you choose that the process is basically the same. The armors themselves are in open roofed buildings. They are relatively close and social so snare one and pull it out. As the other suits come out snare them as you can. If you don’t happen to grab 4 go back and grab another.
I chose to pull them North East to the wall and run my quads there. You don’t want to play out in the field if possible due to adds. Also Lev helps a bit with this camp.

A quad mid progress.

The entry way for the 6 spawn.


Levels: 55-59 - Geonids
Zone: The Wakening Land
Locations
- -1684, 145
Percent of times it will be camped: 60%
Benefits: Cash, consistent pulls.
Drawbacks: Beefy mobs and have to work around the Shamans.
Description:
This is not a beginner’s camp. Nor is it one that will make you very popular with players in zone. The key to this camp is using social agro to your advantage and quickly moving mobs out of the tunnels to kite. I prefer the backside entrance to the Geo caves for this reason. In addition it gives a little pillar you can use to go right or left depending on shaman spawns.
The prime targets for this kite is obviously A Geonid's. I use the similar method to what I did in my early days at the Kodiaks camp. I go in and pass 4 Geo’s. I then cast Flame lick on the 4th Geo and use it to drag the other 3 out of the cave Via social agro. Once outside you can treat this as a normal quad.
The only thing we have to avoid is A Geonid Shaman's. As you would expect they are casters. There are a couple ways to avoid it. Either using the pathing around the pillar at the back entrance, Or harmony. If you are lucky and find a player camping these you can simply ask him if he minds killing the shaman so you can pull a quad around him.

The inside of the geonid caves.

Either way if someone is camping the back side you are probably going to be pulling over top of their head and that won’t earn you any brownie points! “being friendly & courteous to players here is a must. You won’t regret it”
I HIGHLY recommend having a lumin and C2 for this kite. These guys are beefy. At level 58 once you get Fist of karana these are more manageable but still difficult
These mobs do drop Velious quest gems as well as some really good gem/jewelry loot. This has made it a popular camp and just about anyone that can solo will at one time or another hit the Geo’s
Levels: 57-60 - Othmirs
Zone: Cobalt Scar
Locations
- Beach part of the zone
Percent of times it will be camped: 10%
Benefits: Cash, Pelts, Crusty Armor.
Drawbacks: Shaman buff the Warriors, Chief summons.
Description:
The quadable mob that will take you all the way to 60 are Othmir’s. In particular An Othmir Warrior's!
The key here is that you really do not want to just jump the gun on this quad. Wait till you are 57. You will have a lot easier time pulling the mobs.
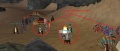
Before we begin here are a few notes for you regarding all 3 camps. First you must remember that the shamans in each camp have been buffing the Warriors so you should expect them to be Hasted and SoW’ed. If a pull goes badly or you manage to get a shaman your best bet is to run out over the water and gate out. “DO NOT BIND IN ZONE”. Secondly you will need to use Harmony to deal with the shaman,named and Chief. Lastly you will want to run your quad up top where the Wyvern are, So your CoV Faction is going to matter if you choose to do this kite. When i pull them up I use Lev and just run straight up the cliff. Its quicker than running to the ramp.
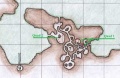
There are 3 camps on the beach to focus your attention on. My Preferred Camp is Camp 2 but camps 1 and 3 are easy to pull as well.
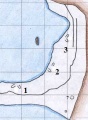
Map of the camps.

Camp #1.
Camp #2.
Camp #3.


Camp 1 is fairly easy to pull and probably where you should start getting your feet wet with Othmir. The Harmony targets are the 2 named and the group of Shaman. I prefer to do my harmony casting from the beach side of the camp here.
Camp 2 is my favorite camp. The mobs you will want to harmony are the chief and the shamans. I prefer to start my Harmony’s with the chief first. The shaman will all get hit with 1 harmony. On this camp I prefer to use Lev and be on the beach side for my harmony casting
The final camp is closest to the ramp up, but my least favorite. This is mostly because in order to feel safe you really should cast 3 harmonies here. The 2 names are in different huts and for some reason do not consistently get hit with the Harmony on the shaman. Some people prefer this camp due to its closeness to the ramp. But honestly since I use lev and run up the cliffs it really doesn’t help that much.
The Warriors can drop Othmir Fur "25 plat per", Velious Class gems, Crustacean Shell Armor "3k a set !" That has always made me wonder why more folks do not hunt these. The only real down side is if you ever want to do the Othmir Prrexus Totem Quest or Lodi Shell Shield Quest. You will have some faction work to do on Walruses in EW.
Credit
Saum
The Quad Kiting Kid
Original content: Guide to Quad Kiting velious